Since both these methods are widely used in the aesthetics market nowadays, it is important not to mix them up, even though they are based on the same principle: inducing injury in order to perform repair or stimulation of the skin. It can be in the epidermis or the dermis, so pay special attention to the calibration of your needles, because skin is really thinner than it seems! But before we get into the many mysteries of cutaneous healing, potential results, limitations, complications and, especially, the problems that may occur when these methods are not exercised in a sufficiently hygienic environment, we will start with a bit of history and a quick review of definitions.
All those reflections about the use of needles for therapeutic purposes started with French physician Michel Pistor in 1952—yes, more than 65 years ago. However, this method appeared on the Canadian market just a few years ago. Understandably, there are still a few adjustments to be made, but time is running out because, so far, it seems to me like we’re doing more harm than good!
So, mesotherapy is a medical procedure developed by Dr. Pistor, defined by the Société française de mésothérapie as “local, highly superficial (intra-epidermic, intradermic or hypodermic) injections of small doses of medication at the site where the disorder or pain is felt.” This makes it a therapy reserved exclusively for adequately trained physicians.
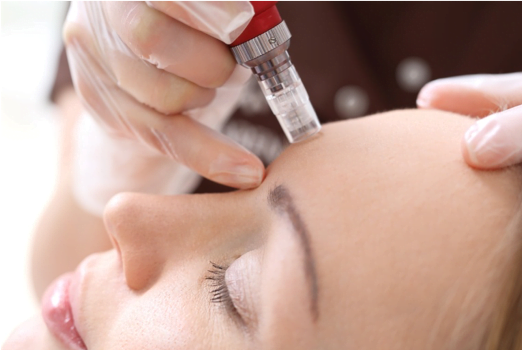
Microneedling is defined as “a procedure using an electric impulse pen holding several single-use microneedles of various diameters.” This means that products are not necessarily injected. You will better understand the benefits once we have discussed the healing process. The major problem is that, healing is practically never part of the curriculum in any courses or, if it is, it’s very poorly understood.
Tip: look for the device with the most needles, because 12 is better than 6, since it will allow you to divide the surface tension, thus somewhat reducing the pain while optimizing the results. There are also 24-needle models for the more delicate areas of the face (forehead, upper cheek, chin) and 36-needle models for the very delicate area around the eye.
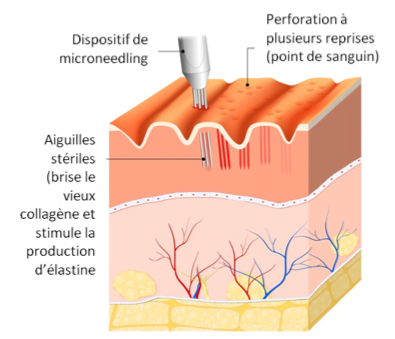
The more holes there are on the same surface, the more the results will be visible and clear. Be careful never to cover the same area twice, as you might provoke the skin and disturb its repair mechanism. A brief aside here, about those famous rollers: TO BE AVOIDED AT ALL COSTS! Why? Because their angle of penetration changes constantly, so you risk scratching the skin more than stimulating its adequate repair; they provide inconsistent results and, most of all, they are impossible to clean properly. The closer the angle of penetration is to 90⁰, the lesser the risk of marking, i.e. leaving a white spot or a scar on the surface of the skin.
We discussed earlier the thickness of the skin. Don’t forget: it has an average thickness (epidermis and dermis) of 1.2 mm, which is reduced by 6% every 10 years. So, the older the client undergoing treatment (anti-aging), the more important it is to accurately assess the thickness of the skin so as not to pierce it too deeply, or else the bleeding may become uncontrollable. Should that be the case, it means you went too far and you’re probably in the hypoderm, where blood vessels are slightly larger than in the dermis.
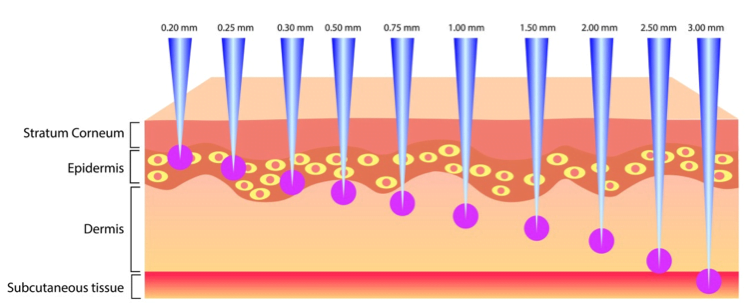
To get results based on dermis rejuvenation, you must absolutely see a dot or droplet of blood, because that’s the only way to know whether you’ve reached the dermis, as there are no blood vessels in the epidermis! When the bleeding is too heavy, you also have a higher risk of infection. This is why, any time you’re doing this type of treatment, your workspace should look more like an operating theatre than a relaxing environment. If it is impossible to control the hygiene of your room, use a practically empty room that will be EXCLUSIVELY dedicated to these treatments. Way too many cases of infection and necrosis have already been reported!
The only facial cases where mesotherapy or microneedling treatments are performed merely on the surface, reaching the epidermis only, are when you’re treating acne scars. The good news is, this procedure is simpler and faster in terms of skin repair.
Let’s look more closely at the three phases of epidermic healing:
- Migration: In the hours following the lesion or treatment, the keratinocytes become fusiform (spindle-shaped) to increase their mobility. They must move to fill the space (the hole) caused by the needles.
- Proliferation: The mitoses (production of new cells to replace the damaged cells) of keratinocytes start 2 hours after the lesion, with a peak at about 48 hours. Advise your clients to carefully hydrate and protect their skin during the first 3 days following the treatment.
- Maturation: The keratinocytes return to their original form. The basal membrane reconstitutes itself in 2 to 6 days, and so, in the days following the treatment, they will begin their differentiation to reconstitute a clean cornified layer without any apparent scars.
As you can see, as long as we stay only in the epidermis, everything should be healed in about a week, which is ideal for teenagers. This process is fast because keratinocytes are genetically programmed to renew themselves, which is not the case with fibroblasts in the dermis. Then, wait ’til you see the lengthy process when you induce dermic healing!
This is done in four steps:
- This is done in four steps:
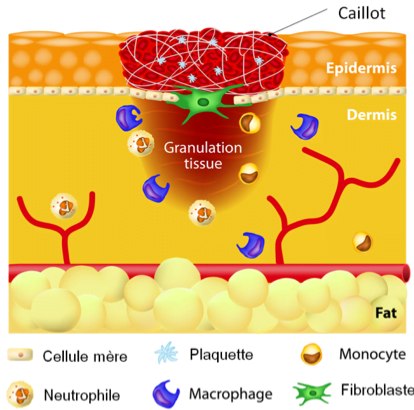
- Exudative phase: Inflammatory event starting from the platelets of the affected blood vessel. Debridement (removal of dead and damaged cells) by macrophages that release growth factors. This phase lasts 3 to 5 days. The point to remember about this phase: only the macrophages, when they manage to digest a fibroblast or a fiber (collagen and elastin) affected by a needle, have this ability to release growth factors to stimulate the division of a neighbouring fibroblast. And as you can see, we took hours for the epidermis, but we need days for the dermis, so notify your clients of the actual healing times. Also, a protective, occlusive and repair cream needs to be applied for at least the first week following the treatment.
- Collagen synthesis phase: About 24 hours after the lesion or treatment, the dermis will start actively synthesizing neoformed type III collagen. Subsequently, it will remodel itself to return to type I collagen form. And so the restoration of mechanical properties will begin! Since it is much faster for the body to produce collagen than to renew a cell, when this phase goes out of control, we tend to develop pathological scars (hypertrophic or keloid). Young people and people with black skin are more liable to develop pathological scars than others. So don’t resort to this type of treatment for anti-aging purposes on people aged 30 or less: it’s completely useless!
- Fibroblastic proliferation: On the 3rd day after the lesion, the fibroblast next to a macrophage having just released growth factors will begin its cell division process to compensate the losses. Be respectful of your dermis, but even more of your clients’, since we get a pool of fibroblasts at birth and it’s normal to lose some with age, but the only way the body can produce more is to damage a few of them using a method such as mesotherapy or microneedling to force the body to produce more. We can’t submit to a course of treatment every year for 20 years, so be strategic in your approach to these methods. Skin is not an unlimited organ!
- Contraction phase: The transformation of certain fibroblasts into myofibroblasts able to move and contract, so they can return to the place where a fibroblast was previously destroyed. They appear around the 10th day and disappear around the 21st day.
- This is done in four steps:
And there you have it, we just completed a skin healing cycle, and not a simple one! Remember that the skin will remain open and vulnerable for at least 3 weeks, and that the skin’s surface already plays host to a lot of bacteria (refer to the article on skin flora), not to mention their countless numbers in the air and even in the products we use in clinics and at home. So the risk of infection is very real and you must consider it at every step, from the preparation of your workspace to the preparation of your client’s skin before the treatment. Complete disinfection of everything around you is in order!
Now, let’s talk products. If you’re doing microneedling alone, no products are required during the treatment, but you will need a cicatrizant cream to apply on the skin afterwards while the cornified layer reforms, but don’t apply just anything. These specialty products exist in dermatology and pharmacology since 2014 in Canada, so consult your representatives to ask if your brand has one. Ingredients to look for: D-panthenol (vitamin B5), Centella asiatica (Madecassol®), allantoin, zinc oxide (more active than zinc sulfate), hyaluronic acids (both high and low molecular weight) and native collagen can also do the job.
If you practice mesotherapy, don’t forget that this is a medical procedure and that the serum you inject should come in sterile form in order to avoid any cross-contamination during the treatment and the penetration of preservation agent directly into the bloodstream. If you’re in the dermis, you have access to the blood vessels, which are the highways of the human body. You would not want to insert hormone disruptors directly into the dermis of your clients!
To conclude, I leave you with Dr. Pistor’s motto, which was, “Inject sparingly, rarely, in the right place.” Enjoy that treatment!